Budget Macro Keyboard for PC Audio Management
I have a lot of audio input/output devices - headphones mic, audio interface mic, webcam mic and even more different audio outputs. Switching between them fast all of the time is a bit of a pain.
I often use programs that don't have built-in settings for overriding the used audio device and switching between different audio devices can be a lot of pain.
For example Chrome - it uses the default input and output devices set by Windows. This means that if you want to change your active microphone, you need to open Settings => System => Sound and make the change there. Too slow!
If you're a streamer - that's even worse - you want to have hotkeys for your scenes as well!
My solution
I solved my issue by creating a DIY macro keyboard, which runs VBS/Powershell scripts to change my audio devices.
This approach allows me to change my active microphone separately from my active audio output device.
Don't worry, it's not hard to setup and/or customize!
Macro keyboard overview
You need:
- Cheap numpad (ideally wireless) or a spare keyboard
- HID Macros (free software)
- Basic VBS skills
HID Macros is an awesome free tool that changes the behaviour of your keys.
But the really awesome part is that it recognises not only the key, but the device it belongs to. For example you can have 3 full-size keyboards and each key on each keyboard could be set to a different macro!
HID Macros setup
Download the program from here. Make sure you download the HidMacros and not the LuaMacros.
Unzip the files and put them in a permament location, make a folder in C:/Program Files or in a custom folder in your choice.
IMPORTANT!
-
Run the program as Administrator the first time, it needs that so it can set up everything.
-
Don't forget to click "Save configuration" and "Compile all" every time you make a change.
-
This program needs to be running in order for your macros to work. It does not have a setting for running when your computer starts, so you need to do that manually.
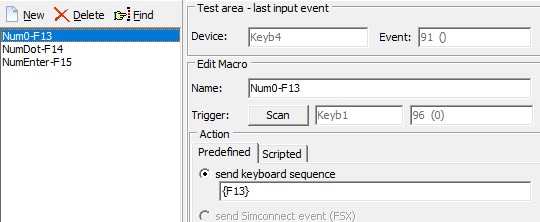
To add your macro, just click on "New", enter a "Name" and click "Scan" to record the trigger key.
For the name I like to put the name of the actual key and the remapped key, for example Num5-CtrlShiftF12. That way you can keep things organized. Keep in mind that you can't reorder items, so all you have are the macro names.
Add a key re-bind
This is the easist option, however for some programs it might not work properly (for example Discord).
You can re-bind your numpad keys to F13-F35. You can also add modifiers to create combinations like Ctrl+F13, Shift+F13, etc, so you have a LOT of shortcuts to work with. For example:
- F15 =>
{F15} - Ctrl + F15 =>
^{F15} - Shift + F15 =>
+{F15} - Alt + F15 =>
%{F15} - Ctrl + Alt + Shift + F15 =>
^+%{F15}
Here is a link to the full list of available keys.
Run a program/script
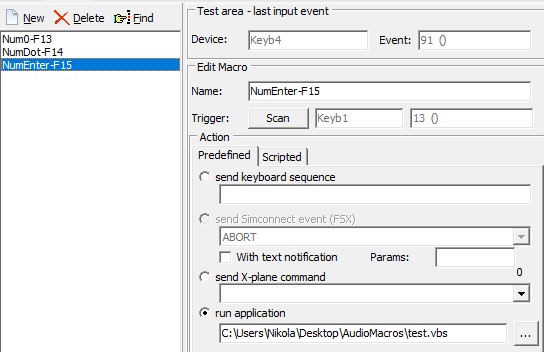
This is where things get really powerful. You can run your own VBS script macro on keypress.
Just attach the VBS file in the "run application" field and you're good to go.
Also remember to click the "Save configuration" and "Compile all" buttons on top of the program.
Audio management Powershell script
The audio switching relies on AudioDeviceCmdlets. It's a free Powershell extension that allows you to manage your devices programatically.
To install it, open Powershell as Administrator and run the following command:
After you have that installed, create a folder somewhere on your PC. This will hold all of our scripts and macros.
Create a new text file and name it SetAudioDevice.ps1. It's important to make sure that the extension is actually .ps1 and not .txt.
I've created a simple script that accepts the names of the devices as parameters (audio and mic), enumerates all of your devices and if there is a match - sets it as the active device. You need to provide the exact device name, otherwise it won't work.
Paste the script below and save the file.
param ($audio=$null, $mic=$null)

if ($audio -eq $null -and $mic -eq $null)
{
    exit
}

$devices = Get-AudioDevice -List

$audioNameRegex = "^($($audio))\s[(].*[)]$"
$micNameRegex = "^($($mic))\s[(].*[)]$"

foreach ($device in $devices)
{
    if ($audio -ne $null -and $device.Type -eq "Playback" -and $device.Name -match $audioNameRegex)
    {
        Set-AudioDevice -ID $device.Id
    }

    if ($mic -ne $null -and $device.Type -eq "Recording" -and $device.Name -match $micNameRegex)
    {
        Set-AudioDevice -ID $device.Id
    }
}
In order to make using this script easier, I like to rename my devices beforehand and give them short and clear names to avoid confusion.
On Windows 11 you can do that by going to Settings => System => Sound and opening the properties of the device. Keep in mind that you have to rename the audio output and the microphone separately, so try to set a simple convention like "Headphones" and "Headphones Mic".
Now if you open a Powershell window and navigate to your folder (run cd C:\yourfolder in the terminal), you can execute that powershell script.
For example to set the audio output device to "Speakers Presonus" and the microphone to the "Webcam Mic", run the following command:
You can use only one of them or both at the same time, it doesn't matter.
Important! If you get an error, this means that you have to allow your computer to run unsigned Powershell scripts locally
To do that open a new Powershell window as an Administrator and enter the following command:
After that try again and it should work.
In order to run this script from anywhere on your system, use the full path of the script, for example:
Great! You can control your audio devices with a script!
However there is one small problem, the HID Macros does not work with Powershell scripts. That's why we have to create a VBS script for each of our devices.
Creating VBS scripts and binding them to a key
Create a new file called speakers-presonus.vbs (or whatever your device name is). Make sure it's in the same directory as the Powershell script from the previous step.
Open it with notepad and paste the following:
Dim audio
audio = "Speakers Presonus"

Dim mic
mic = "Webcam Mic"

Dim ps_command
ps_command = ".\SetAudioDevices.ps1 -audio '" & audio & "' -mic '" & mic & "'"

Set objShell = CreateObject("Wscript.shell")
objShell.run "powershell.exe -command " & ps_command, 0
If you want to change only the "audio" or only the "mic", feel free to delete everything between the quotes, so you are left with:
Now go back to HID Macros and put the full path of the VBS file in the "run application" field for your specific key macro. Remember to click on "Save configuration" and "Compile all" and voila!
Now pressing the corresponding key changes your audio device(s)!